

Picture the review desk at a national lender. Three stacks of appraisal reports, all waiting. The reviewer opens the first one, scrolls through the photos, and immediately flags it. Missing subject rear elevation. Kitchen photo shows only cabinets, no overall view. Comp photos taken from across the street instead of curbside. That appraiser just bought themselves a 48-hour revision cycle.
Second report. Every required shot is there, but the file names are a mess — IMG_2847.jpg, DSC0094.jpg, photo(1).jpg. The reviewer has to manually cross-reference each image with the narrative to figure out what they're even looking at. Another flag, another delay.
Third report loads. Clear subject front, all four elevations, street scene both directions, every room interior, all six comps with consistent angles. File names follow a clean pattern: SubjectFront123MainSt.jpg, Comp1Front456OakAve.jpg. Metadata shows GPS coordinates matching the addresses. That one moves straight to the approval queue.
The difference between those three reports? About 15 minutes of photo organization during the inspection. Those 15 minutes determine whether you're closing on schedule or scrambling through revision requests while your pipeline backs up.
Why lenders reject technically accurate appraisals over photo issues
Most appraisers assume photo standards exist to document property condition. That's part of it. But the deeper purpose is building defensible evidence trails that hold up under GSE audits, investor reviews, and potential buyback scenarios years later.
When Fannie Mae samples a lender's portfolio and pulls a 2019 appraisal, they're not just checking for a kitchen photo. They're verifying that the image proves physical inspection occurred, that the metadata aligns with the inspection date, and that photo quality can support accurate condition assessment even five years later.
A blurry kitchen photo taken at night might technically show the space exists, but it won't support a retrospective value defense when the loan goes sideways. Lenders know this, which is why reviewers flag anything that creates downstream risk.
The metadata piece gets overlooked constantly. Your camera timestamps every photo. If those timestamps don't match your stated inspection date — or worse, show you photographed all six comps in 12 minutes across a 5-mile radius — you've created an audit red flag that implies a drive-by inspection.
The actual photo requirements by property type
Single-family detached properties need more than the basic six-photo minimum everyone remembers from training. Current standards require:
Manage every appraisal with confidence and clarity.
Rateoly helps you coordinate inspections, generate reports, and communicate seamlessly with clients.
- Comprehensive appraisal tracking
- Automated client notifications
- Integrated scheduling & report management
No credit card required
Subject property minimum set:
-
Front elevation (straight on, full facade)
-
Rear elevation (not just a corner angle)
-
Street scene (both directions)
-
Kitchen (wide angle showing appliances and cabinets)
-
All bathrooms (full room view, not just fixtures)
-
Main living area
-
Basement or crawl space access
-
Attic access point or ceiling condition
-
Any unusual features affecting value
-
Deferred maintenance items mentioned in the report
Condominium units require different angles:
-
Building entrance (not unit entrance)
-
Unit entrance from hallway
-
Hallway or common area leading to the unit
-
Kitchen (same wide angle requirement)
-
All bathrooms
-
Living areas
-
Bedrooms
-
Balcony or patio if present
-
Parking space (assigned or deeded)
-
Storage unit if included
The condo mistakes almost always happen with exterior shots. Photographing the building from the parking lot doesn't establish the unit's location within the complex. You need shots that show which floor, which side of the building, and the path from parking to unit door.
Multi-family properties multiply the complexity:
-
Each unit needs interior documentation
-
Separate utility areas
-
Common spaces between units
-
Individual entrances
-
Basement and storage allocation
-
Mechanical systems serving each unit
The trap with multi-family is assuming you can photograph one unit and note "all units similar." Even if layouts match, condition varies. Reviewers want proof you entered every unit.
Manufactured homes bring their own requirements:
-
HUD label (clear, readable)
-
Serial number plate
-
Foundation type (full perimeter shot)
-
Utility connections
-
Anchoring and tie-down system
-
Skirting condition
Missing the HUD label photo triggers an automatic revision request. The serial number needs to be legible enough to cross-reference with title documents. Blurry smartphone shots of metallic plates won't cut it.
The naming convention that prevents revision requests
Random camera-generated file names create friction. The reviewer shouldn't need to decode IMG8274.jpg versus DSC0983.jpg to understand your documentation.
A functional naming pattern follows this structure: [PropertyType][Location]_[Address].jpg
Examples that work:
-
SubjectFront_123MainSt.jpg
-
SubjectRear_123MainSt.jpg
-
SubjectKitchen_123MainSt.jpg
-
Comp1Front_789PineRd.jpg
-
Comp2Front_321MapleAve.jpg
The address component matters when reports get separated from their photo sets during long review chains. A folder full of "SubjectFront.jpg" files from different appraisals creates confusion fast. Including the address prevents that.
Some appraisers overcomplicate it with dates and MLS numbers: SubjectFront123MainSt20240115MLS8274652.jpg. That makes files harder to scan visually. Keep it simple but specific.
Batch renaming tools handle this in seconds — you're not manually typing each name. Set up your pattern once, select your photos, apply the rename.
Metadata integrity and the GPS coordinate trap
Every photo you take embeds EXIF data — timestamp, GPS coordinates, camera settings. Lenders increasingly use this metadata to verify inspection authenticity. They can tell if you photographed six comps in impossible timeframes, or if your "Tuesday inspection" photos were actually taken Thursday.
GPS creates problems when photographers don't understand accuracy limitations. Phone GPS can be off by 50 to 100 feet, especially in dense urban areas or rural dead zones. If your comp photo GPS shows you standing in someone's backyard instead of the street, that raises questions you don't want to answer.
The timestamp issue hits when appraisers photograph comps on different days but report a single inspection date. Your metadata shows Comp 1–3 on Monday, Comp 4–6 on Wednesday, but the report states Tuesday. Instant red flag.
Camera clock drift creates similar headaches. That DSLR you haven't synced since daylight saving time might timestamp photos an hour off from reality. When compared against your reported inspection schedule, discrepancies surface.
Some appraisers try stripping metadata to avoid these issues. That's worse. Missing metadata looks like intentional concealment. Instead, make sure your timestamps align with reality and your GPS readings make geographical sense.
Photo quality thresholds that matter to underwriters
Resolution requirements seem straightforward — most lenders want 1024x768 minimum. But resolution alone doesn't determine acceptability. A high-resolution photo shot through a dirty windshield still gets rejected.
Exposure matters more than megapixels. A bright white house photographed at noon creates blown-out highlights where architectural details disappear. A dark brown house shot at dusk becomes an unreadable shadow. Reviewers can't assess condition from photos where half the image is over or underexposed.
Focus failures show up constantly with smartphone photography. Autofocus locks on the tree branch in the foreground while the house blurs behind it. Or focus hunts in low light, producing soft images that look fine on a phone screen but fall apart on a monitor.
Motion blur from handheld shots in dim interiors makes rooms look worse than they are. A slightly soft photo implies poor maintenance even in well-kept properties — reviewers make those assumptions.
The wide-angle distortion problem surfaces in interior shots. Ultra-wide lenses make rooms look larger but warp proportions — straight walls appear curved, rectangular rooms look trapezoidal. Some lenders specifically prohibit extreme wide-angle photography for this reason.
What review desks actually check in your photo packages
The review process follows a pattern most appraisers don't fully see. First pass: do all required photos exist? Second pass: does photo content match the report narrative? Third pass: internal consistency.
That consistency check catches discrepancies. Your report describes "updated kitchen with stainless appliances" but photos show white appliances. You note "newly renovated bathroom" but the photos reveal dated fixtures. These mismatches trigger clarification requests even when values are well-supported.
Seasonal inconsistencies raise flags too. Exterior photos showing full summer foliage, interior photos with holiday decorations visible, comp photos with snow on the ground — all supposedly from the same April inspection. Reviewers notice.
The comparison angle review gets more granular than most appraisers expect. Comps photographed from consistent distances and angles signal professionalism. One comp from the street, another from the driveway, a third from across the intersection suggests rushed documentation.
Shadow direction gets analyzed more often than appraisers realize. Morning shadows pointing west in some photos, afternoon shadows pointing east in others, supposedly from the same inspection window. These details matter when inspection authenticity gets questioned.
Building photo packages that survive audit scrutiny
The photo package you submit today might get reviewed again in three years when a loan enters foreclosure. Building audit-resistant documentation starts during the inspection, not in post-processing.
Document your documentation. A simple photo log noting time, sequence, and any access limitations provides context for future reviews. "Rear elevation photographed from neighbor's yard with permission" explains an unusual angle. "Basement photos limited due to tenant storage" clarifies incomplete coverage.
Photograph more than required, submit what's needed. Storage is cheap, revision requests aren't. That extra bathroom angle or additional comp view might prevent a callback. You can exclude photos from submission — you can't photograph properties retroactively.
The establishing shot concept helps with orientation. Before detailed room photos, take a wider shot showing how spaces connect. This helps reviewers understand property flow and confirms you didn't just photograph random rooms.
Weather documentation prevents seasonal questions. Wet pavement, frost on grass, leaf conditions — these timestamp your inspection naturally and organically.
Comp photo angles that eliminate questions
The ideal comp photo angle matches your subject photo angle as closely as possible. Front elevation to front elevation, straight on, from similar distance. This enables genuine visual comparison, which is the whole point.
The drive-by angle problem is everywhere in comp documentation. Shooting through your passenger window while rolling past creates angular distortion, includes foreground obstructions, and signals minimal effort. Park, exit the vehicle, frame properly.
Distance consistency matters for scale comparison. A subject photographed from the sidewalk versus a comp photographed from across the street makes size assessment impossible.
Obstructions require some judgment. That comp has a massive tree blocking the front facade — shoot through branches, take an angled view, or find another vantage point. Document what's visible, note the limitation, include additional angles if needed.
Private road access creates its own challenges. You can't always achieve ideal angles when properties sit behind gates or long driveways. Document what's accessible, note access limitations in your photo log, and use online imagery to supplement if necessary — with clear labeling.
Converting inspection photos into compliant documentation
Raw inspection photos rarely meet submission standards without some processing. Not heavy editing — proper optimization and organization.
Exposure adjustments bring out details hidden in shadows or blown highlights. That dark northern exposure brightens to reveal siding condition. Keep adjustments subtle. You're clarifying, not altering reality.
Crop for relevance, not deception. Removing excess sky or foreground focuses attention on the property. But cropping out visible damage crosses into misrepresentation. Include everything relevant, exclude only true excess.
Size optimization balances quality with file limits. A 24-megapixel raw file needs reduction for submission, but over-compression creates artifacts. Find the point where images stay sharp but files stay manageable.
Batch processing saves time. Apply consistent adjustments across similar photos — slight brightness boost on interiors, minor contrast enhancement on exteriors. Consistency in processing creates professional presentation.
Common photo rejection triggers hiding in plain sight
The partial room photo fails constantly. Showing just the corner of a kitchen or one wall of a bedroom doesn't document the space. Reviewers need a sense of the room — size, configuration, condition. That close-up of granite countertops misses the bigger picture.
Window glare blinds important details. Bright windows in interior shots blow out to white rectangles, eliminating view assessment and hiding condition details. Control exposure for the room, not the windows.
Clutter obscures architecture. Rooms packed with personal belongings hide actual space and condition. You can't demand staging, but you can find angles that reveal more of the structure and less of someone's stuff.
Night photography almost always gets rejected. Poor lighting, harsh shadows, color casts from mixed light sources — nothing good comes from after-dark exterior shots. If scheduling forces an evening inspection, return for exterior photos during daylight.
Using historical MLS photos creates timestamp problems. That listing photo from last year might show the kitchen perfectly, but metadata exposes it. Take fresh photos, even if prior documentation exists.
Technology shifts in appraisal photo standards
AI-powered review systems now scan photos for completeness, quality, and consistency automatically. These systems catch issues that human reviewers occasionally miss under time pressure.
Automated measurement tools extract dimensions from photos and compare them against reported values. That 12x15 bedroom should look proportional in photos, or the discrepancy gets flagged.
Multi-spectral imaging is entering high-end reviews. Some lenders use infrared analysis to detect moisture issues not visible in standard photography. Appraisers don't need thermal cameras yet, but understanding that additional analysis occurs explains some seemingly arbitrary rejections.
Cloud-based photo management standardizes submission. Direct field-to-lender upload eliminates compression and corruption from multiple file transfers. It also means photos need to be submission-ready at capture, not after hours of desktop processing.
Blockchain verification is being piloted at several major lenders to timestamp and authenticate photos at capture. Once that goes mainstream, post-inspection photo manipulation becomes impossible. Developing solid field photography habits now is the smarter play.
Photo workflow automation that maintains compliance
The manual photo workflow — shoot, download, rename, resize, organize, upload — consumes real time per report. Modern appraisal software handles more of these tasks automatically, but automation needs proper setup to maintain compliance.
The table below shows where manual workflows break down versus what automated tools handle:
| Workflow Step | Manual Risk | Automated Handling |
|---|---|---|
| File naming | Inconsistent or wrong convention | Preset patterns applied at import |
| Required shot check | Missed rooms caught after the fact | Flagged before leaving the field |
| Metadata verification | Timestamp or GPS mismatch missed | Cross-referenced against inspection records |
| Photo organization | Wrong folder, wrong report | Sorted by property type and room automatically |
| Submission sizing | Over-compressed or too large | Batch optimized to lender specs |
AI-powered photo organization tools can sort images by room type, identify missing required shots, and flag quality issues before submission. The software reads image content, recognizes kitchen versus bathroom versus exterior, and organizes accordingly — removing the manual sorting burden while catching gaps before they become revision requests.
Automated naming follows preset patterns based on property type and photo content. The system identifies subject versus comp, exterior versus interior, and applies the appropriate naming convention. No more manual renaming of large file batches.
Quality checking can also run before you leave the field. Real-time feedback prevents return trips by warning when photos fall below acceptance thresholds. Metadata management runs in the background — GPS coordinates verified against property addresses, timestamps aligned with reported inspection schedules, discrepancies flagged before they become audit triggers.
The connection between photo management and report writing eliminates duplicate work. Photos flow directly into report templates, maintaining naming conventions and organization throughout the process.
Use this workflow image as a quick field checklist.
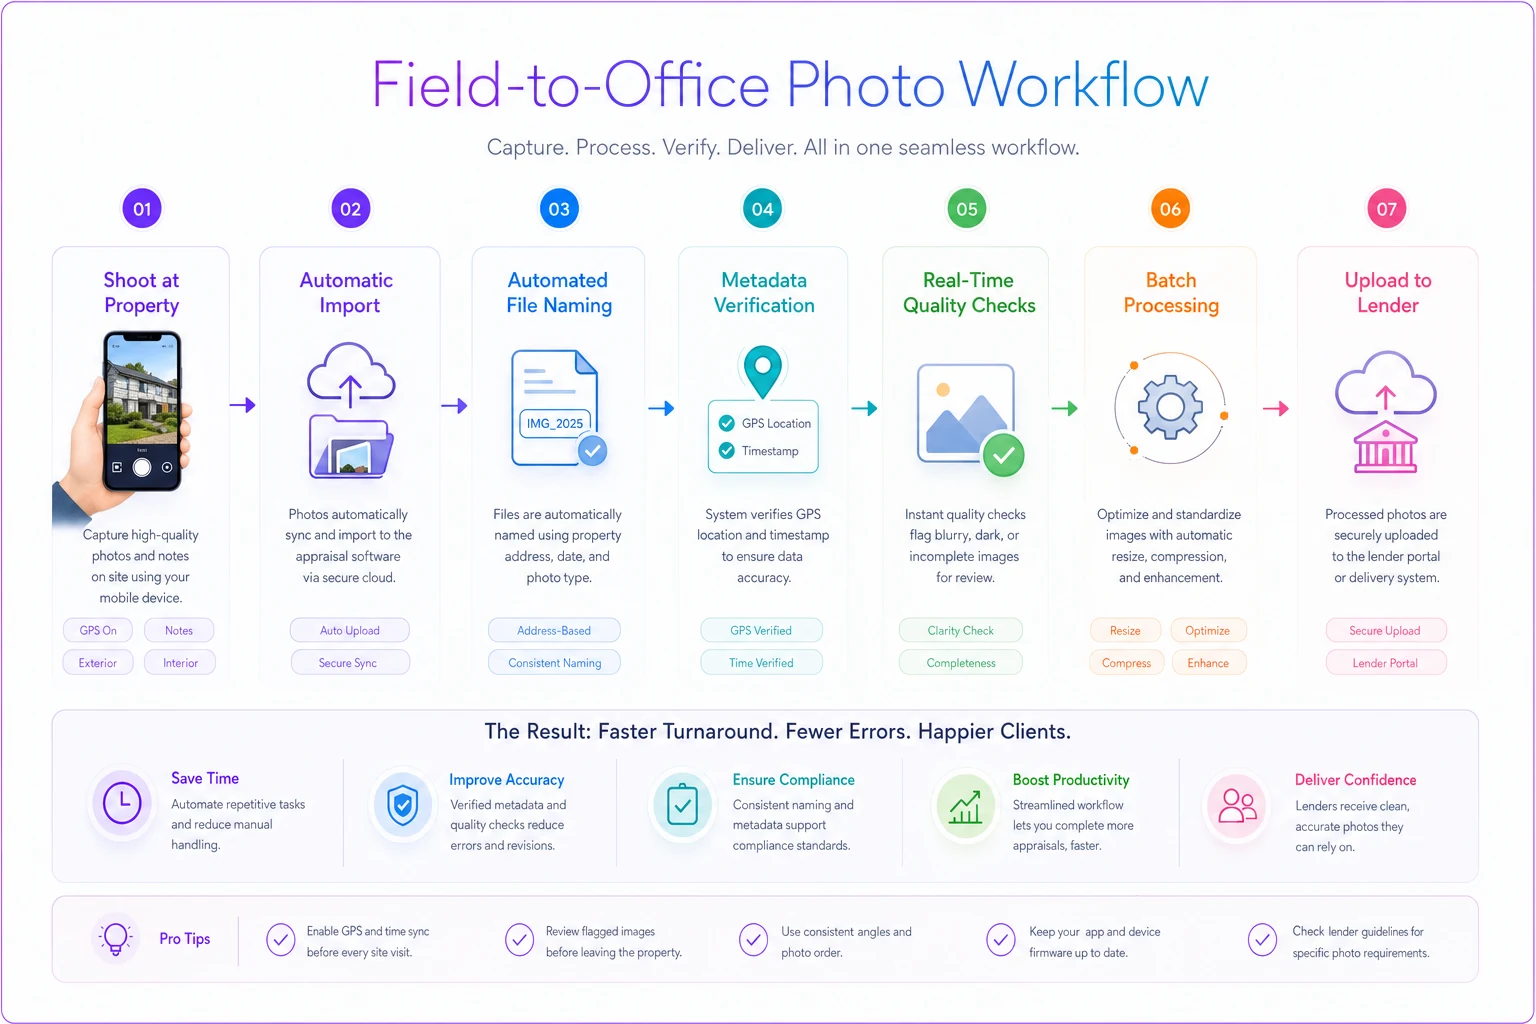
The table and automation examples show how to eliminate manual failure points and keep submissions consistent.
Setting up consistent photo standards for your practice
Start with clear inspection protocols. Create shot lists by property type. Print them, laminate them, keep them in your kit. Follow the same sequence every inspection.
A repeatable field sequence looks like this:
-
Arrive at subject property, photograph street scene both directions before exiting the vehicle
-
Photograph subject front elevation, straight on from the sidewalk
-
Walk clockwise around the exterior — right side, rear, left side
-
Document any deferred maintenance or unusual features as you go
-
Enter through the front door, photograph living areas in logical flow
-
Kitchen wide angle, then appliance close-ups if condition warrants
-
All bathrooms, full room view first
-
Bedrooms in order
-
Basement or crawl space access, attic access
-
Return for comp photography using the same distance and angle discipline
Laminate a single-sheet shot list and keep it in your kit to speed inspections and ensure consistency.
Build muscle memory for this sequence. Consistent patterns prevent missed shots without requiring mental checklists every time.
Invest in the right equipment for challenging situations. A clip-on wide-angle lens for tight spaces, a portable LED panel for dark basements, a polarizing filter for window glare. The right tool prevents problematic photos before they happen.
Create template folder structures for different property types. Single-family folders, condo folders, multi-family folders, each with subfolders for required shots. Drop photos into preset structures instead of organizing from scratch each time.
Before leaving any property, review photos on your camera or tablet. Check exposure, verify completeness, confirm quality. Five minutes on-site saves hours of revision work later.
When photo packages define your reputation
Your photo package represents your professionalism more visibly than almost any other appraisal component. Clean, organized, comprehensive documentation signals thorough inspection and attention to detail. Sloppy or incomplete photos suggest rushed work, regardless of how strong your analysis actually is.
Review desk staff remember appraisers by their photo packages. "This appraiser always sends great photos" leads to faster reviews, fewer clarifications, better lender relationships. The opposite leads to increased scrutiny, more revisions, and eventually panel removal.
The efficiency gain compounds over time. Consistent photo quality reduces friction, accelerates acceptance, and recovers time. Maybe 30 minutes saved per report through avoided revisions — that adds up to weeks annually across a real workload.
Fewer revisions also mean more predictable cash flow and less stress during busy periods. A photo problem on Monday becomes a revision request Wednesday and delayed payment Friday. Solid photo standards remove that friction entirely.
The long-term value shows in audit outcomes. When a three-year-old appraisal gets pulled for review, comprehensive photo documentation defends your work better than any narrative. Clear, organized, complete photo packages provide evidence that holds up when it needs to be.
Managing photo standards at scale
For solo practitioners, personal discipline is enough. For team operations or high-volume practices, you need standardized workflows — not just expectations.
The training investment pays immediately. Two hours teaching photo standards saves twenty in revisions. Show examples of accepted versus rejected photos, explain the reasoning, demonstrate technique. Most photo problems come from not knowing the standard, not carelessness.
Quality control checkpoints catch issues before submission. Whether manual review or automated scanning, checking photos before reports leave your office prevents client-facing failures. Internal revisions are always less painful than external ones.
Technology integration enforces compliance without adding burden. Modern appraisal management platforms can require minimum photo quantities, check naming conventions, and validate metadata automatically. The software becomes a compliance layer that runs quietly in the background.
Performance tracking identifies patterns. If certain team members consistently trigger photo-related revisions, targeted coaching fixes specific weaknesses. If certain property types generate more issues, enhanced protocols for those scenarios reduce future problems.
The standardization work feels constraining at first but creates real efficiency eventually. Once photo workflows become automatic, mental energy shifts to market analysis and value reasoning — the actual skilled work of appraisal. That's where your time and attention should be going, and solid photo standards are what gets you there.
The standardization work feels constraining at first but creates real efficiency eventually. Once photo workflows become automatic, mental energy shifts to market analysis and value reasoning — the actual skilled work of appraisal. That's where your time and attention should be going, and solid photo standards are what gets you there.
Performance tracking identifies patterns. If certain team members consistently trigger photo-related revisions, targeted coaching fixes specific weaknesses. If certain property types generate more issues, enhanced protocols for those scenarios reduce future problems.
Ready to elevate your appraisal operations?
Join 500+ appraisal firms using Rateoly to enhance accuracy, save time, and improve client satisfaction.